Showing posts with label recipe. Show all posts

Nov 23, 2014

Chai Tea for Two (latte, if you like)

I  remember the first time I tasted chai, in a friend's kitchen. The creamy texture and slightly spiced flavor took me by surprise. "Oh wow!" I said. "This is like drinking pumpkin pie!"

image: livesimply.me

Since that first taste, I've loved chai, but I don't drink it often because if you make it with a purchased mix or buy it in a coffee shop, it's usually loaded with sugar. However, inspired by this recipe for Chai Tea Latte from Live Simply (and modified to reduce the syrup), I've been making this the past couple days, and it's the perfect cold-weather pick-me-up when you want something richer than plain tea. (The original recipe makes enough for four servings, so you can enjoy one right away and then keep the extra on hand in the fridge. Smart! I love make-aheads!)

It uses maple syrup for the sweetener, but you can substitute the sugar or sweetener of your choice. I also replaced the half-and-half with culinary coconut milk; the canned kind; not the thinner stuff that comes in quart cartons. But you can use half-and-half, or another dairy substitute that you like. I've also streamlined the process a bit because, well, I'm impatient! I use a ready-made spice mix. And I use the microwave, and just let it steep for two or three minutes. But if you're patient and have the time, you can let it steep the full five minutes at each step.

Chai mixture:
1 cup water
1-1/2 teaspoons pumpkin pie spice or apple pie spice*
1 tea bag or about 1.5 teasp. loose tea -- any unflavored black tea will do
1 TB pure maple syrup
1 or 2 grinds of freshly ground black pepper (optional)

Latte additions:
1/2 cup milk of your choice     
    (recommended: something rich and somewhat fatty, like coconut milk or half-and-half.)
maple syrup to taste

Put the water and spice mix in a glass measuring cup or other microwave-safe container and heat until it steams. Take it out, and let sit for at least two and up to five minutes. Cut open the tea bag and pour the contents into the hot water. Add a couple grinds of black pepper if you like. Return it to the microwave and heat again till steaming. Let it steep for three to five minutes.

While it's steeping, prepare the milk. Heat it slightly in the microwave. Do NOT let it boil. 

Frothing the milk is optional -- but it's the thing that takes this drink from chai to chai latte. There are various ways to froth the milk. You can do this with a stick blender, or by hand, using this method, or just by holding a wire whisk and rolling it quickly between your palms like this: 

(The baby orangutan is optional.)
At this time, you can also preheat your two serving cups, to help the chai stay hotter. Fill them with the hottest water that will come out of your tap, and let that sit till you're ready to serve.

Once the tea is done steeping, dump the hot water out of your serving cups. Pour the tea mixture through a fine sieve into another container. Rinse the sieve, then pour through it again as you're decanting the tea into each serving cup. Top with even portions of the milk, and taste to see if you want more sweetness; sweeten to taste.

Then snuggle into a cozy chair and drink that pumpkin pie!

*If you don't have pumpkin pie or apple pie spice mix, you may use:
1 whole clove (optional)
1 tsp ground cinnamon
1/2 tsp ground ginger
pinch ground nutmeg (optional)
pinch ground allspice (optional)

Apr 7, 2014

Spinach salad with strawberries


This is my second-favorite salad of all time, a close second to quinoa and spinach salad -- and no surprise there, since they contain many of the same ingredients.

I think a big part of what keeps this one at the top of my list over other green salads is that I only buy strawberries when they're in season. (My test for whether they're good and ripe? If there's a box of them at table height and I can smell them when standing over them, they're good!) And since here in Kansas, good strawberries are only available April through June, this salad is a rare treat.

(SO jealous of my niece who lives in California, and can get amazing ripened-in-the-field strawberries year-round!)

It's good with or without chicken, and all ingredients can be adjusted to your taste.


Recipe: Spinach salad with strawberries

For each individual salad:
2.5 oz. baby spinach (or thereabouts)
sliced fresh strawberries, to your taste (maybe 1/2 a cup?)
1 - 3 T. feta cheese, seasoned or plain
red onion, sliced thin; amount to taste
1.4 c. pecan halves (or to taste)
half of a seasoned, cooked chicken breast (about 3 oz.) - optional
balsamic vinaigrette or onion poppyseed dressing, to taste

Combine all ingredients; toss; enjoy!
----------------
Nutrition info, according to myfitnesspal.com:
Calories: 444
Carbs: 17
Fat: 32
Protein: 24
Sodium:  780
Sugar: 9

Feb 26, 2013

Emergency blueberry crumble for one


Blueberries in the freezer, snow outside on the ground, and a hankerin' for something warm and sweet. What to make, that's slightly healthy but also bona fide comfort food?!

Blueberry crumble, of course! (Blueberries are a super food. Old fashioned oatmeal's not bad either.)

Based on this recipe for Microwave Blueberry Crumble (four servings), here's a version that goes together super fast and easy (less than five minutes!), can be made sugar-reduced, and is scaled to make just one serving. And if you use gluten-free oatmeal and cornstarch, it could also be gluten-free!

I'm including instructions for topping it with a bit of vanilla-flavored cream, but you could, of course, top it with ice cream instead. Depending on the severity of your emergency and the contents of your freezer.

Emergency blueberry crumble for one

1 cup fresh or frozen blueberries
2 t. sugar (or one Splenda packet)
3/4 t. cornstarch
2 T. old fashioned oats
2 T. packed brown sugar (or 1 T. brown sugar Splenda blend)
1 T. chopped pecans
1/8 teaspoon cinnamon and/or a wee pinch of nutmeg
1 T. cold butter (no exceptions)
3 T. heavy cream
splash of vanilla extract

Place the blueberries in a 4- to 5-" microwave-safe dish (I used the cover of an extra-wide butter dish). Sprinkle the sugar and cornstarch on top. Cover and microwave on high for 30 seconds; stir and heat on high another 30 seconds. Repeat until the blueberries are softened and the sauce is slightly thickened.

In a small bowl, stir together the oats, brown sugar, pecans and cinnamon. Cut in the butter into the oat mixture using a fork, until the mixture resembles very coarse crumbs. You want there to still be some globs of butter, though; not completely smoothed out.

Sprinkle the oat mixture over the blueberry mixture. Cover and microwave on high for 30 seconds; stir and heat on high another 30 seconds.

Pour a splash of vanilla extract into the cream; stir till combined. Drizzle over the blueberries. Grab a spoon and enjoy!

Feb 1, 2013

Salted-caramel glazed oatmeal cookies


I love it when a recipe goes wrong, then turns into something oh so right!

One of my favorite cookies is sunflower seed oatmeal cookies. (Gibbers', too.) I made a batch today to take to a neighborhood get-together tonight, but I played with the proportions a bit too much, and they came out kinda bland. So I thought a caramel icing might balance that out.


And it did! But I couldn't just leave it at that. Since "salted caramel whatever" is everywhere these days, I thought I'd give them just a light sprinkling of kosher salt.

Perfect! The cakey/crispy texture of the cookie contrasts nicely with the gooey caramel, and they do balance each other out. That icing would also rock drizzled over banana cake, muffins, or banana-nut bread!

I can't give you the cookie part of my recipe, because I swapped Splenda for some of the sugar, just added the dry ingredient mix till it looked right, and same on the oatmeal. But the base recipe I was working from is the standard one on every carton of Quaker Oatmeal: Vanishing Oatmeal Raisin Cookies. I leave out the cinnamon and swap sunflower seeds for raisins.

On to the icing...

I started with a recipe on AllRecipes.com, but changed it substantially. Here's what I ended up with:

Caramel icing

covers three dozen cookies

 2 T. butter
 1/4 c. cream
 1/2 c. packed brown sugar
1/2 c. powdered sugar (or less)
1/2 t. vanilla
Kosher or sea salt to taste (optional)

Melt the butter in a saucepan over medium heat. Then stir in the cream and brown sugar. Boil vigorously for 1 minute.
Remove from heat, and beat in half of the powdered sugar. Cool slightly, and beat in the vanilla and the remaining powdered sugar. Taste it as you add a bit at a time; you may not need all of it. 
It sets up pretty quickly, so have your cookies all ready before you make the icing. If it gets too thick, add more cream and/or return it to low heat for a moment.
Drizzle over the cookies. Sprinkle lightly w/ kosher or sea salt, if desired.


Aug 28, 2012

Buttermilk Ranch Dressing Recipe


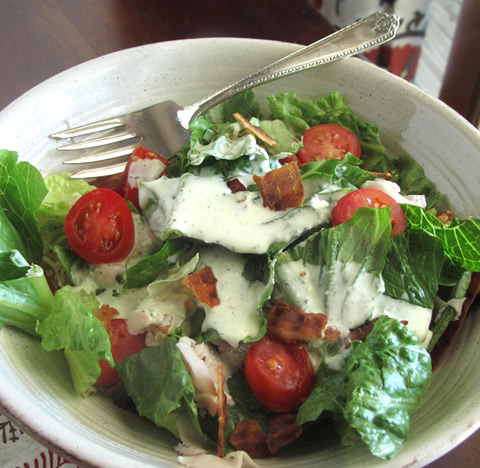
Looking for things to do with summer's last abundance of garden tomatoes? When you're tired of BLT's (is that possible?), this is one delicious way to serve up the same flavors with a twist.

This recipe is based on Ina Garten's (aka Barefoot Contessa) buttermilk ranch dressing. I'm not saying I could improve on her: these changes were just made to accommodate my being short on fresh basil, my husband's aversion to too much mustard flavor, and our taste for less salt in things. Also, I prefer the taste of yogurt to that of mayo, so I tweaked that proportion a bit.

I loved how it came out! I ate this salad or some variation of it for four days straight! I hope you'll love it, too.

Recipe: Buttermilk Ranch Dressing

3 green onions, white and green parts, chopped
2 T. chopped fresh basil leaves, lightly packed (or 2 t. dried)
2 T. freshly squeezed lemon juice
2 t. Dijon mustard
1 T. good olive oil
2 garlic cloves, chopped
1 t. kosher salt
1 t. freshly ground black pepper
1/2 cup mayonnaise
2 cup Greek-style yogurt
1/2 cup buttermilk, shaken
----
3 small Bibb lettuces, cut in half through the core
   (or 6 hearts of romaine, cut in half through the core, or equivalent loose-leaf chopped)
2 large ripe tomatoes, cut in large cubes, or smaller tomatoes thickly sliced
1 red onion, sliced (optional)
bacon, amount to your liking (optional, but highly recommended)

Place the green onions, basil, lemon juice, mustard, olive oil, garlic, salt, and pepper in the bowl of a food processor fitted with the steel blade. Puree for 15 to 20 seconds to make a smooth mixture. Add the mayonnaise, yogurt, and buttermilk and blend until smooth. Transfer the dressing to a container, cover, and refrigerate for at least 1 hour, for the flavors to develop.
Arrange the salad ingredients on salad plates and drizzle with the dressing. Sprinkle with fresh ground pepper if desired, and serve.

Serves 6.


Aug 8, 2012

Happy "Sneak some zucchini onto your neighbor's porch" Day!

And what to do with said zucchini (or summer squash) if you're the lucky recipient.

Whether it was you or your neighbor who planted too much zucchini this year, here are a few recipes for using up that infamous garden bounty. (Summer squash is its yellow cousin; no significant difference in taste.)


Pizza bites. They are cute; also the perfect size to pop in your mouth whole. Easy, gluten-free appetizer or snack.


Summer squash (or zucchini) topped with sausage and cheese. A quick easy dish to prep ahead of time, and then assemble and cook in about 15 minutes.


Zucchini noodles with peanut sauce. Quick-and-easy, low carb, and tasty, too!

For those who are looking for something sweet, and aren't trying to avoid flour, here are a couple recipes for you. 


Elise's Grandma's zucchini cake with cream cheese frosting! This sounds like carrot cake -- one of the few cakes I will always be willing to blow my diet for! I haven't tried this recipe, but it's from SimplyRecipes, and every recipe I've ever tried there has been a winner. I'm sure this one is no different.


Zucchini bread. If you've never tried zucchini bread, you really must! It's a sweet quick bread (read "muffin-like"), akin to banana bread, but without the banana overtones. You really don't taste the zucchini at all; it just lends moisture to the party. The predominant flavors come from the cinnamon and sugar. And you know that can't be bad! 
       I made this recipe from AllRecipes earlier this week to take to a ladies social, because it was rated five stars after more than 3,800 reviews! And it was a hit with everyone, but it's a little sweet for me as is. If you are, like me, living a mostly sugar-free life, you might want to cut back on the sugar by 1/4 to 3/4 cup. (Here's a healthier version I haven't tried.) 

Jun 5, 2012

Recipe review: Herb Roasted Pork Tenderloin

(Plus a recipe for Emergency Herbs de Provence)

It was one of those days when 4:30 was here before I knew it, and I didn't have dinner planned. I have no good excuse. Not even a lousy one.

What to do? Same as usual, when "the usual" doesn't sound good... Hit a recipe website I trust and search for "quick." After a couple other stand-by's (All Recipes, Simply Recipes), I landed on Pioneer Woman and came up with her Herb Roasted Pork Tenderloin with Preserves. Which sounds and look very elegant, but is super, super simple, and comes together in 30 minutes or less.

photo by Pioneer Woman
Basically, you salt and pepper a pork tenderloin, then coat it generously in Herbs de Provence before roasting. Top it off with a simple fruit-preserves-based sauce.

Not having any Herbs de Provence on hand, I googled for a recipe. I came up with several, but ended up using (as a starting point) this one by Emeril. (Yeah, we're on a first-name basis.)

Herbs de Provence often contains lavender, but I didn't have any on hand.  :/

Why this one? Well, because all the herbs have the same proportion, and I like simple! From what I understand, Herbs de Provence has some standard ingredients that are almost always in the mix, but the mix has evolved over time and also, every cook has his or her own variation. Which is great, because there were several ingredients I didn't have on hand. So here's my variation:

Recipe: (Emergency) Herbs de Provence

for one 1.35 lb. tenderloin; multiply as needed

1 t. dried basil
1 t. dried oregano
1 t. dried rosemary
1 t. dried thyme
1/4 t. dried ground sage

PW's original recipe called for 8 tablespoons of H.d.P. That's half a cup - yikes! She was cooking up two whole tenderloins; I was just fixing one tenderloin, slightly over one pound. So I just used all of the above mix, and I still thought it was plenty potently 'picy!

A note on cooking pork... Rather than cooking by time, use a meat thermometer. Pull the roast from the oven when the temp hits 140-145 F. Then tent lightly with foil and let rest at room temp, till the internal temp hits about 160. Slice and serve. Mmm... perfectly tender and juicy!

For the sauce, PW recommends fig, peach, plum, or whatever preserves you wish. I used blackberry. It adds a lovely sweetness that mellows the pungent herb crust. Perfect for a quick dinner for just me and the hubs -- but impressive and foolproof enough to serve special guests!

May 28, 2012

Easy roasted chicken breasts


One of the best things you can do to make quick, healthy dinners more doable is to have some already-cooked chicken on hand. The stuff you buy ready-cooked at the grocery is loaded with salt, probably has corn syrup in it, and doesn't taste all that great. Here is the simplest, lowest-hassle, and most delicious method I've found for make-ahead chicken.

If you want to be super efficient, make enough to stash for future use, plus enough for dinner tonight, and serve it straight out of the oven -- it's great on its own, too!

Recipe (really, just a method):

Chicken breasts, roasted to use in recipes


Bone-in, skin-on chicken breasts
Olive oil (about 1 teasp. per breast)
Salt and pepper to taste

Preheat the oven to 350 F.

Line a baking sheet with foil, and spray or oil it. Place the chicken breasts, skin side up, in the pan with an inch more more between them. Brush the tops liberally with olive oil, then lightly with salt and pepper, according to your taste. Place a meat thermometer 2" into the fleshy part of the largest piece, trying not to hit bone. (Which would make the temperature misread.)


Bake uncovered until the internal temperature hits 165 F. If you don't have an accurate thermometer, the skin should be a light golden-brown...


...but the juices should also run clear. To clearly see the color of the juices, slip a white dish under the edge of one breast and poke a hole just above it. Let some juice run into the dish, and look at it in good light. This test looked a little pink, so I stuck the chicken back in for about five minutes.


But also be careful not to overcook it! That's what makes chicken tough and dry. If in doubt, pull it out a little on the underdone side. The outer and smaller parts of the chicken will probably be cooked through, with a little more pinkness in the center. Save the more-done pieces for salads and sandwiches; use the slightly underdone pieces for dishes that will get cooked some more, like soups, casseroles, and enchiladas.

If you're serving the chicken right away, though, make sure that everything you serve is cooked through.

To store for future use, let chicken sit at room temp or in the fridge till it's cool enough to handle. Pull off and discard the skin. Pull the chicken meat off the bone. Discard the bones. You can bag the meat and store as is, or cut into bite size pieces, or shred -- whatever works for your use. Store in tightly covered containers or plastic bags.

The FDA says that cooked chicken can be kept three to four days in the fridge, or up to four months in the freezer.

Tomorrow I'll post a round-up of six of my salad recipes that use chicken!

May 25, 2012

Individual lemon icebox pies


When I was a kid, dessert was not a forbidden thing. We almost always had some ice cream in the freezer, and/or a frozen chocolate cream pie or lemon icebox pie. I loved the lemon pie, and would sneak small slivers off of it every now and then. I suspect that the reason I never got caught was that I wasn't the only one in the house doing it, and s0 my mom probably assumed my dad was the culprit!

These mini-pies are quick and easy to whip up at home, and they have that same sweet-and-tangy appeal as the freezer pie in my memory! But these are sugar-free, gluten-free, corn syrup-free, and you control whether there's food coloring, and what kind of sweetener goes in!


Recipe for:Individual lemon icebox pies

makes 6-8, depending on serving sizes

1/2 c. pecan pieces
8 oz. cream cheese
zest of one lemon
juice of one lemon (or 1/2 or 3/4, depending on how sour you like things)
4 pkts. Splenda (or sweetener of your choice, equiv. to 8 teasp. sugar)
1/2 t. vanilla
2 drops yellow food coloring (optional)
1/4 c. cream
whipped cream:
1/2 c. cream
1 pkt. Splenda
1/2 t. vanilla

See my recipe for No-bake lime cheesecake shooters for the crust-making and assembly method, using 4-oz. Mason jars as the serving dishes.

Once the jars are filled and topped with whipped cream, attach the lids and place in the freezer for at least three hours. I haven't tested them for longevity, but I'm pretty sure you could keep them frozen for up to several days at least with no problem.

Remove from the freezer 45 minutes before serving time and let thaw at room temp. Remove lids, garnish if you like, and serve!

Also, this recipe is fantastic turned into cheesecake-stuffed strawberries! No freezing, for that option.


Here's the nutrition info, via myfitnesspal.com; this is for a single serving (of eight servings), with the crust, but with NO whipped cream.

Nutrition Facts Per Serving   Servings 8
Calories 163
Total Fat 16 g
Saturated Fat 7 g
Monounsaturated Fat 6 g
Polyunsaturated Fat 2 g
Trans Fat 0 g
Sodium 87 mg
Potassium 95 mg
Total Carbohydrate 3 g
Dietary Fiber 1 g
Sugars 0 g
Protein 3 g

May 16, 2012

Summer squash topped with sausage and cheese -- or just cheese


This is a quick easy dish to prep ahead of time, and then assemble and cook in about 15 minutes. It evolved from a recipe for stuffed portobello mushrooms -- which is good, don't get me wrong! -- but I think I like it better on squash.

In these pictures, I was testing a batch without the sundried tomatoes, but I don't recommend skipping them. I think they add an important zing to the dish.

Recipe: Summer squash topped with sausage and cheese

 Ready In: 30 Minutes      Servings: 3

1/2 cup Jimmy Dean® Original Hearty Turkey Sausage Crumbles
1/2 cup shredded Italian cheese blend, divided
2 tablespoons ricotta cheese
1 green onion, thinly sliced
1 T. finely chopped sun-dried tomatoes, rehydrated
1 medium summer squash
Optional for plain squash slices:
olive oil
salt and freshly ground pepper
grated Parmesan cheese

Preheat oven to 350 degrees F. Line a baking sheet with parchment paper. Combine sausage, half of the shredded cheese, ricotta cheese, onions and tomatoes in medium bowl. 


Lay the squash flat on cutting board, and cut off the bottom on a diagonal.


Slice the rest of the squash, parallel to the first cut, in approximately 1/2" thick slabs. 


You'll have some large diameter slices and some small ones. If you're prepping this meal early in the day, you can put everything in the fridge now to hold till you're ready to bake.


Lay the slices on the prepared baking sheet. Divide the sausage mixture among the slices; first just dump some on (shown upper left in the photo below), then pat it down with your fingers (shown in the top second one). Sprinkle the remaining cheese over the sausage mixture.


You may top all the slices this way, or you can use the two or three smallest ones without the sausage topping. If you're not topping all the slices, brush the bare ones with olive oil and sprinkle with salt and pepper.

Bake 10-12 minutes or until squash is just tender. Remove from the oven. 


Sprinkle the plain slices with grated parmesan. 


Serve it all up. Yummmm!


Apr 25, 2012

Asian lettuce wraps


This is another one of those dishes that you can prep early in the day, and throw together in minutes come dinner time. Also low carb and low fat!

Recipe: Asian lettuce wraps

Makes 4 servings

about 1.3 lbs. ground turkey
1/2 large onion, sliced thin
1 teaspoon sesame oil
3 T. lower sodium soy sauce
1 pkt. Splenda or equivalent sweetener
1/4 to 1 teaspoon crushed red pepper (less for mild; more for hot)
1 T. fresh ginger, minced
1 clove garlic, minced
2 teaspoons ground coriander
2 cups coleslaw mix with carrots, (or more)
butter lettuce or romaine lettuce leaves, for wraps
fresh cilantro and chopped cashews, for garnish, optional

This is the slaw mix I use:


Brown the turkey and onions in a large skillet; when the turkey is mostly browned but still showing some pink, drain the fat. Meanwhile, combine the sesame oil through the crushed pepper in a small bowl and set aside.


Add the ginger, garlic and coriander to the pan; stir-fry for a couple minutes.


If you're prepping ahead of time, you can stop here and refrigerate the meat and sauce. When ready to serve, just reheat and proceed. Also, since I was just cooking for two of us, I pulled out half the meat and put it in the fridge for lunch the next day. Be sure to only add half the sauce and cole slaw to the pan if you do this.

Add the cole slaw and the soy sauce mixture. Cook and stir constantly for one or two minutes.


(I'm warming up leftovers the next day in the photo above; that's why the skillet's smaller.)

Serve the meat mixture with lettuce leaves to fill, and roll up to eat. Offer cilantro and cashews for topping, if desired.


Apr 21, 2012

Sugar free chocolate bark + your favorite toppings!


Here's a really simple recipe that looks and tastes completely decadent, but it's low carb/South Beach diet friendly, because it's sugar free! You can top it with whatever toppings float your boat; I first tried it with a mix of chopped almonds and unsweetened coconut on one end (shown above), and salty pepitas (roasted hull-less pumpkin seeds) on the other.


I served this for dessert last night -- just the hubs and me. Here's what it looked like when we started...


Here's what it looked like when we were done:


And no, he is not putting that back in the pan!

Clearly, the almond/coconut end was the favorite! The slight sweetness of both coconut and almond goes nicely with the semi-sweet, almost bitter flavor of this chocolate. I think the pepitas would taste great with a sweeter, perhaps milkier chocolate. I'll try that another day.

But today, there's a new batch in the fridge that's all almond/coconut!

Recipe: Sugar-free chocolate bark

Note: If you're not avoiding sugar, substitute up to 1/4 c. of sugar for the Splenda.

6 T. butter
1 oz. unsweetened chocolate (one square of baking chocolate)
1/4 c. + 2 T. cocoa (unsweetened)
6 pkts. Splenda
1/2 t. vanilla
toppings of your choice, probably around 1/4 to 1/2 cup

Prepare a 10x15 pan by lining it with parchment. Trim the parchment if necessary so that it extends over the long sides of the pan, but does not come up the short sides of the pan at all. (My photos above show how not to do that!) Clip the parchment to the sides, if you like, with some clothespins or other large clips. Set aside.

Melt the butter and the baking chocolate in the top of a double boiler over simmering water. Stir occasionally until melted. Add in the cocoa and Splenda, and continue to stir until the mixture is smooth. Add in the vanilla, stir until combined, then pour it into the prepared pan. Spread the chocolate out to a fairly even smoothness. It doesn't need to be perfect.

Sprinkle your toppings of choice over the chocolate, then chill for a couple hours at least. Keep it refrigerated when not serving (or snitching) it, because it softens quickly.

If you're looking for a recipe with a different sweetener, here are some other options:

Apr 20, 2012

Quick chipotle pork tacos


This is slightly adapted from Chipotle Pork Tacos by Our Best Bites. It's a great dish to prep earlier in the day -- or the night before -- then throw together just before dinner. Even the prep is pretty easy, but once everything's ready to go in the skillet, it cooks in minutes.

The original recipe calls for lime zest, lime juice and brown sugar. But to eliminate the sugar and still keep things tangy and sweet, I substituted orange for the lime. I think it tastes great, and it even got an enthusiastic thumbs up from the hubs, who usually isn't too fond of citrus in meat dishes.

Recipe: Quick Chipotle Pork Tacos
Serves 4.

3 boneless pork loin chops, about 3/4 to 1" thick (about 1 lb.)
1 ½ tsp grated orange zest
1 T. fresh orange juice
1/2 tsp dry oregano
1 - 2 tsp chopped chipotle chiles in adobo sauce
2 garlic cloves, minced
¼ tsp kosher salt
---
2 T. olive oil, divided
1 c. thinly sliced onions
4 large whole wheat tortillas
sour cream for topping
chopped red or green onion and chopped cilantro for garnish, optional

Zest the orange with a fine grater, so that you get just the orange zest, not the white pith.


Combine orange zest and juice, oregano, chipotles, garlic, and salt. Set aside. 


Trim the excess fat from the pork chops, then slice into strips about 1/2" wide. Cut the longer strips in half. 


Toss the pork strips with the orange juice mixture. At this point you can cover the pork and the onions with plastic wrap, and stick them in the fridge until you're ready to cook.


Heat a large skillet over medium heat and add 1 T olive oil. Add onions and sauté for four minutes or until tender.  Remove from pan and set aside. Add 1 T of olive oil to pan and add pork strips. Saute for 3-4 minutes or until no longer pink. I like to just leave them on one side until you see white creeping around the edges...


...and the first side is nicely browned, them flip them over. Be careful, though; you really don't want to cook them a total of more than about four minutes, or they get too tough and chewy. It might help to take the pan off the heat while you turn them over, then return to heat for a minute or two to finish the second side.

Add pork to onions if you'll serve from the table. At our house, everything goes back into the skillet, and we serve ourselves from there. 

Warm tortillas up with the method of your choice, and fill with pork mixture. Top with sour cream and the garnish of your choice. A great side dish or topper: slightly spicy slaw.


Apr 17, 2012

Salmon with fresh tomato-avocado salsa


This is so simple, and so yummy, it's gonna knock your socks off!

The star of this dish is the salsa. It's so delicious! My husband took leftovers of just the salsa to work for lunch today (I made extra) and when he came home, he said, "If you would make some more of that I'd be very, very happy."

I had a bit of leftover salmon with the salsa on it for lunch, too; cold -- straight out of the fridge. It was still good!

This is based on a recipe from All Recipes, but I prefer butterflying and broiling the salmon, to the nuke-and-serve-cold method in the original recipe. Alternatively, you could grill the salmon; that would be fab, too!

You could also substitute basil for the cilantro. In fact, I think I will, next time I make this. I bet that will rock this dish even more!

I used white corn because it's got a little better carb-to-protein ratio, but I think yellow corn makes a prettier dish. NOTE: To make this dish Paleo/Whole30 compliant, just omit the corn.

Recipe: Salmon with fresh tomato-avocado salsa   

Servings: 3-4

1 cup chopped fresh tomato
1/2 Hass avocado, chopped into about 1/4" pieces
1/2 cup corn (omit for Whole30/Paleo compliance)
1/4 cup minced red onion (a fine dice, or slivers)
1/4 cup chopped fresh cilantro (or basil)
1 garlic clove, crushed
1 T. olive oil
1 T. balsamic vinegar
1.25 lbs. salmon fillets
salt and pepper, to taste
olive oil for drizzling


Chop up the tomato, avocado, garlic, onion, and cilantro (or basil). To dice the avocado, you cut through it like this, leaving the skin intact, then scoop it out with a spoon.


If you want more detail, see Simply Recipes' walk-through. (I do NOT recommend the pit removal method they show in step 2b; a woman I know cut some tendons in her hand trying that trick.) 

In a medium bowl, combine all ingredients from tomato through vinegar. 


Refrigerate at least two hours.

Preheat the broiler. Line a baking sheet with aluminum foil.

How to butterfly salmon
The purpose of butterflying salmon is to make it all about the same thickness, so that it cooks more evenly. It also cuts down on oven time.

Put your salmon on a cutting board, skin side down. (Mine is already in the baking pan in these pics, but it will be easier to work on a cutting board; you don't have to maneuver around the rim of the pan.) Start by making a guide mark: in the thickest point of the fillet, use the tip of your knife to mark the spot exactly halfway from top to bottom.


The black line in the pic below shows where your knife will enter; the white dashed line shows where you will cut. The cut should run right through your halfway mark. 


On the thinnest end of the salmon, slide your knife in parallel to the cutting board, and at the same height as your halfway mark. Continue to cut, keeping your knife parallel to the cutting board. Stop about 3/4" away from the opposite edge; do NOT cut all the way through.


If you have been working on the cutting board, move your salmon to the foil-lined pan now. Next, open the sliced salmon up like it's a book, folding the top piece out so it lays former-top-side down.


Repeat with the other fillet(s), season with salt and pepper, and drizzle with olive oil. 


Broil 4-6" from the heat, just till it flakes easily w/ a fork, about 8-10 minutes per inch of thickness. (That is, the thickness after you butterflied it.)


Remove the salmon from the skin; plate in serving-sized pieces; top with the salsa.


Try it, then come back and tell me how much you love it! :)


Popular Posts