Mar 31, 2012

No-bake lime cheesecake shooters


I love recipes that are elegant enough to serve for special occasions, but easy enough to make every day! And yummy enough that you want to. This is one of those. We make it at least once a week! It gives us a little sugar-free treat after dinner, which really helps cut down on those late-night snacks.  

You're going to be amazed at how simple the crust is. And it's low-carb and gluten-free!

And did I mention easy?

A note about dishes to serve them in... I've served these in little half-pint Mason jars, which is very cute. But I also like the way they look as "shooters." And by the way... my shooter glasses are really just candle votives from Hobby Lobby. The number of servings you get out of this recipe depends on what size dishes you serve it in. If you're planning this for a special occasion, you might want to experiment ahead of time to see how it works out for you.

Then -- oh, darn! -- you'll have to eat your test batch. Oh well, do it for science!


Recipe for:
No-bake lime cheesecake shooters

makes 6-8, depending on serving sizes

1/2 c. pecan pieces
8 oz. cream cheese
zest of one lime
juice of one lime (or 1/2 or 3/4, depending on how sour you like things)
4 pkts. Splenda
1/2 t. vanilla
2 drops yellow food coloring (optional)
1 drop green food coloring (optional)
1/4 c. cream
whipped cream:
1/2 c. cream
1 pkt. Splenda
1/2 t. vanilla

This crazy-simple crust is made of: pecans! That's it! No butter needed.

In the photo below, you can see two different blender blades that came with my favorite kitchen gadget. The four-bladed piece (shown at the top of the photo) chops things up from coarse to fairly fine, depending on how long you run it. The shorter, two-bladed one (on the left) minces things down to a fine powder or -- in the case of nuts -- butter.


In the pic below you can see the difference. The left-hand image shows the pecans after running them with the four-blade piece for a few seconds. This would work just fine for crust if this is all you have. But if you have the second kind of blade, you can grind the pecan pieces until they're so fine they begin to stick together, like in the image on the right, below. This gives you something with the look and consistency of a crust made of graham crackers and butter. Neat, huh?!


Then you just place about 1 tablespoon of ground nuts in the bottom of your serving vessel, and tamp it down with the top of a bottle (securely capped and very clean, of course).


Set those aside while you prep the filling.

If you want a few pieces of lime peeling for garnish, make sure you slice off a couple thin slabs of peel before you grate off any lime zest. Then just slice them up into little slivers and set aside. (I don't recommend eating these. I love sour, but that's too much even for me!)


Now you can zest the lime, and proceed with combining it along with the cream cheese, lime juice, vanilla and sweetener (and food coloring, if you want). Whip this all up till it gets past looking like cottage cheese (top part of the image below), and starts to look smooth and creamy (bottom image).


Then in a separate small bowl, whip the 1/4 cup of cream just until it's stiff enough that pulling the beater out leaves a hole that doesn't fill in. Don't whip too much longer, or you'll wind up with butter.


Gently beat that whipped cream into the cream cheese mixture. Taste, and adjust. Too sour? Add sweetener. Too sweet? Add a little more lime.

Then, combine the remaining cream, vanilla and sweetener, and beat in the same way, but don't add it to the mixture.

Taste it: if it's not sweet enough for you, and if you won't be topping it with sweetened whipped cream, add more sugar/sweetener. (Now that I'm adjusted to living without sugar, I'm more sensitized to the taste, so I tend to under-sweeten things.)

Now, assemble!

Sorry; I forgot to take assembly pictures. I think I must have been overcome with hunger! 

It's pretty simple; you can pipe the stuff in, using a baggie with the corner snipped off, or you can just carefully spoon it in. Lime filling first, then the whipped cream. And top with the garnish, if that's your plan.


You can also make a lemon version, using the zest and juice of half a lemon, and omitting the green food coloring.

Either one is perfect for spring or summer. Mother's Day, Easter, bridal showers, graduation parties. 

Or just a little something after dinner on Tuesday to keep you from raiding the pantry at midnight!


Update 2: Here's the nutrition info, via myfitnesspal.com; this is for a single serving (of eight servings), with the crust, but with NO whipped cream.

Nutrition Facts Per Serving   Servings 8
Calories 163
Total Fat 16 g
Saturated Fat 7 g
Monounsaturated Fat 6 g
Polyunsaturated Fat 2 g
Trans Fat 0 g
Sodium 87 mg
Potassium 95 mg
Total Carbohydrate 3 g
Dietary Fiber 1 g
Sugars 0 g
Protein 3 g


Follow Me on Pinterest

Mar 29, 2012

Herb-crusted salmon


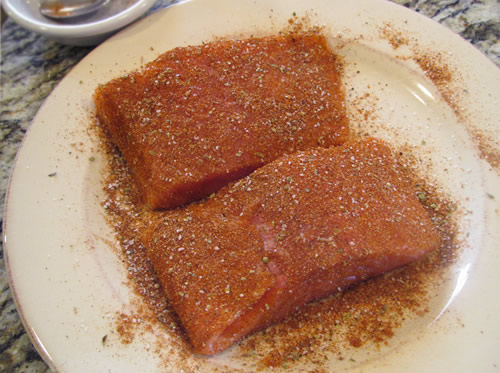
This recipe evolved from a similar dish in one of my favorite cookbooks, Weber's Art of the Grill. (Which is now out of print, but you can still find used copies on Amazon.) You can grill it if you like, or broil it in the oven. The herbs get nice and crispy as they cook, and marry together in a wonderful, savory complement to the flavor of the salmon. Over the years, I've come to just throw it together by memory, and I tend to put in quite a bit more herbs than the original called for. (The recipe that follows is my version.)

It involves a little bit of herb chopping, but if you want, you can let your food processor do that. Then, it's just stir, spread, and broil or grill. So easy!


Recipe: Herb-crusted salmon

Serves 2.

1 lb. salmon fillet
1 handful of fresh cilantro, rough chopped
1 handful of fresh parsley, ditto
1 handful of fresh basil, ditto (or about a tablespoon of dried)
2 T. olive oil
1 t. soy sauce
1/2 t. chili powder (or ancho chili powder)
1/4 t. kosher salt
pepper to taste

Preheat your grill or broiler (whichever you're using). If using the oven, place the top rack about 6" from the heat.

If using a broiler, coat a 9 x 13" pan with cooking spray, a generous brushing of canola oil, or line the bottom with foil.

Chop all of the herbs coarsely and put them in a small bowl. They don't need to be finely minced, because they will shrink some and get crispy as they cook. Here's the cilantro, before and after.


Add in the 2 T. olive oil, the soy sauce, and chili powder, and stir till everything is well combined.

Lay your salmon skin side down in the baking pan (or on whatever surface you'll use to transfer it to the grill). Scoop the herb mixture on top of the salmon, and spread it around into a thick, fairly consistent layer. There will be bits of salmon showing through here and there; that's okay.


Once the herb mixture is on, sprinkle it lightly with kosher salt and fresh ground pepper to your liking. You don't need much salt, because the chunks are big and will be the first thing to hit your tongue. (I highly recommend kosher salt, but if you're using regular salt, use half as much.)


For the grill: Place the fish herb side down on the grate. I know, it seems wrong! You think all the herbs will fall off, but trust me. A few may fall off, but most of them don't! Our propane grill instructions say to turn the three burners to medium/off/medium. Do what works best on your particular grill. Close grill and cook that side for half the total cooking time. When it's half through, flip it herb side up, and cook until it's done.

For the broiler: Place the baking pan -- with the fish herb side up -- in the oven. Bake it there for five minutes, then move the rack down one row to complete cooking.


Your total cooking time should be 10 minutes per inch of thickness, measured at the thickest part.

When is it done? I'll repeat an earlier posting... "A minute or two before the recommended time, check your fish. Just poke a fork gently into the side at a thick place, and pull it up a bit to see if it flakes easily. You can also pull up just enough to see the interior of the fish, and see if it's done to your liking. Some people like their salmon a bit rare, so that it's orangey-er on the inside. Not me: I like it just done all the way through, but just so -- not overdone and dry."

Then remove from the heat, slide a spatula between the skin and the fish, and slip it onto your serving plate, herb side up.

Once you've tried this, feel free to experiment with your choice of herbs and spices. Let me know how it comes out!

You might also like:
Ancho-crusted salmon with avocado crema
Slightly spicy slaw
Green beans and pine nuts

Mar 28, 2012

Recipe review: Super-thin pizza crust


Pizza crust made from scratch doesn't happen around here unless my carb-lovin' daughter is home. She's tried several different recipes, and this one from food.com is her favorite. It's easy, pretty foolproof, and has a nice crispy crunch to it. Also, it only calls for eight minutes of resting time, so there's not a long wait for the dough to rise.

She says, "Kneading is key to both the chew and the crunch. Use the windowpane test to see if the dough has been kneaded long enough."

And for low-carbers, here's my favorite low-carb quick fix for a pizza craving.

(Note: the above photo is by Wildflour, a food.com user.)

Mar 25, 2012

Peanut butter cups - homemade!


Today's post is a guest appearance by our dear daughter, Annica. Which can only mean one thing: There will be carbs!

Hello, blogosphere! There's a new sheriff in town. By which I mean I am taking over my mom's blog for a day! If you follow the blog (the wonderful, magnificent, glorious thing that is “oh, that's tasty!”) you'll know that I've been mentioned before – in passing. I'm a poor, malnourished college student, so when I come home, my parents make sure I am well fed. And I always help them along with a culinary splurge or two of my own. ;)

At the beginning of spring break, my dad announced that he was absolutely, definitely not going to bake anything sweet while I was home, and he would appreciate it if I would do the same. He didn't want my Rushmore-sized sweet tooth undermining his diet – understandably so. (I've done it before, and I regret to say, I'm all too likely to do it again.) 

Well, fast-forward to yesterday, when he says: “Hey, we should bake something to mail up to your brother.” And if some of the mail-destined sweets happen to “accidentally” make their way into our mouths, well… (Diet be damned, apparently!)

Today I head back to dorm food and Easy Mac, so yeah, I was good with making something sweet!

We debated for a few minutes about what to make, and finally settled on homemade peanut butter cups. I'd made them before, and I knew that while my brother is a fan of Reese's, he no longer would be after eating one of these babies. (Yes, they are that good.)

I went onto allrecipes.com and pulled up this recipe. Plus side: it only calls for four ingredients, all of which are easily found in any pantry in America. (You can dress it up with additions, but let's not get ahead of ourselves here.) Down side: it takes a while to make, and if you want to stay clean … well, that ain't gonna happen, flat out.

Start by melting half of a standard 11.5 oz bag of chocolate chips: milk, white, or dark. (I'm usually a dark chocolate gal – the darker the better – but peanut butter goes well with any percentage. I can honestly say I have no preference.) We used chocolate chips, but also threw in some Ghiardelli chocolate bars.


I used our double boiler, because our microwave is now sitting in my dorm room, 158 miles away. Kinda inconvenient. But you could just put the chips in a plastic baggie and nuke them on the lowest setting until they're almost melted. You'll want to be careful to take them out just a little bit early, though. Over-heated chocolate gets thick and muddy, and you don't want that near your peanut butter!


Fill a mini muffin tin with mini muffin liners. A helpful hint: the smaller the ridges on them, the better. If your muffin liners have deep ridges, they'll be harder to peel off.

If you melted your chocolate in a plastic baggie, congratulations! You have automatically completed the next step! If you didn't, transfer your melted chocolate to a plastic baggie and snip off just the tip of one corner. This is where the mess begins, if you're not careful. Here's where the mess begins even if you are careful!

Fill each muffin cup about a quarter to a third full of chocolate. It wouldn't hurt to spray them with a bit of Pam, either. You will want easy access to these things, so anything you can do to make them easier to peel, go for it!


Next, smush the chocolate up the sides. It helps to move your spoon up and in a diagonal motion, not just straight up. Moving it in a diagonal way helps to get the chocolate into the ridges. Be careful not to leave any holes in the chocolate in the bottom of the cup.


Once you've finished this, pop them in the icebox to harden up.

Next up, the peanut butter filling, a.k.a. the easiest thing to make in the world! Just mix up a cup of peanut butter, (I used Kroger's natural creamy because it consists of peanuts and salt only,) ¼ teaspoon of salt, and half a cup of powdered sugar. Some reviewers suggested adding graham cracker crumbs, in order to get that signature Reese's texture. I personally am not a fan of the texture, but if you are, then this would be the way to go.

Once this is mixed up and your shells are hardened, (which only takes a few minutes) take a spoon or a scoop, -- I used a scoop that equals about 2 T. -- and plop the peanut butter mixture into the shells.


You might need to flatten the PB out a little, with the back of a spoon, or clean fingers.


Melt some more chocolate, then transfer to a plastic baggie as before. Snip off the corner, and cover the peanut butter with chocolate. I suggest going from the outside in. That way, the peanut butter doesn't cave, and the chocolate has a chance to meld together. 


Smooth the tops off (if you want), stick 'em in the fridge to harden, and you got yourself a treat to rival an all-American classic!


And just for kicks, how about these weirdos? Yes, the beauty you see before you is nothing less than bacon peanut butter cups.


My dad is a voracious lover of all meat, especially if that meat has been smoked, and especially if that meat is bacon! We were going to make chocolate-covered bacon, but then I ended up using all of the chocolate on the peanut butter cups. Oops! So we figured, why not get a little bit funky and throw some bacon on the peanut butter cups!

I have to say, I was pleasantly surprised by how well these turned out! You can hardly taste the bacon; it just adds a little bit of saltiness that complements the bitterness of the chocolate nicely, and brings out the saltiness of the peanut butter. If I make these again, however, I'll mix the bacon in with the peanut butter.

I hope you enjoyed my guest blog! Now it's back to school for me! (With some of these little delights stowed away in my suitcase...)

You might also like:

Mar 23, 2012

Low carb (or no carb) tacos

Okay, so the astute observer will recognize that this is just a slight twist on my previous post, Seven-layer dip as salad. Just add seasoned ground beef -- or another taco-appropos protein of your choice -- and ya got yourself a no-carb taco!

You might also like:
Make-ahead Tex-Mex salad
Homemade taco seasoning
Super-easy shredded chicken tacos

Seven-layer dip as salad


I love seven-layer dip -- sometimes called taco dip -- and the dip itself is a pretty low carb treat. Plus, it's got some decidedly healthy ingredients: avocado (15 grams of heart-healthy unsaturated fat, and only 2 grams saturated fat, plus potassium and vitamins C and K); tomatoes (lycopene, vitamins A and C); and the beans are a good source of iron and fiber -- though they're often made with trans fats. But the chips for dipping are not healthy in any way!

So I thought this would be another great dish to make into a salad on a romaine spear. (Which I've done before. More than once.)

This isn't so much a recipe as it is a guideline. The base is a heart-of-romaine leaf, and you'll probably want two to four for each person. This makes a great "assemble yourself" meal, letting everyone customize their own.

Just lay the leaf on the serving plate and smear it with your choice of one or more items from this list:
- refried beans (or just used canned beans for a later layer)
- ready-made guacamole
- sour cream or Greek yogurt, plain or mixed with taco seasoning

Then top that with your choices of:
- canned beans, rinsed and drained; pinto and/or black
- shredded cheese: monterrey jack, cheddar, queso fresca, or a mix
- chopped tomatoes
- diced bell pepper
- sliced green onion or diced red onion
- sliced black olives
- minced cilantro

As you can see, this can end up being more than seven layers -- or less -- depending on your taste and/or what you have on hand.

Here's mine:


You might also like:
Make-ahead Tex-Mex salad
Chicken club salad with creamy balsamic vinaigrette
Ginger-peanut salad dressing for Asian salad

Mar 22, 2012

Places to eat in Wichita: Le Monde

I've been to Le Monde three or four times -- well, at this location, anyway. Years ago, there was a Le Monde downtown, but I don't know if that was the same owners.

The West Street one looks like it was a fast food joint in a former life, but it's been updated on the inside and out with a homier look.

The menu offers a mix of Americanized Euro-ish favorites: quesadillas, ravioli, chicken moutarde; and the Lebanese offerings which are (happily) commonplace in Wichita: hummus, fattoush, and schawarma. The entrees are dominated by pasta offerings: eight, to be exact.

Homemade biscuits are served free while you peruse the menu. Although delicious, they seem a little out of place with the Euro/Mid-Eastern slant of the menu: they taste just like my grandma's shortbread (American farm food), and the ones we were served this time tasted like they'd just come out of the oven.


I usually get the fattoush salad with chicken, but today I was in the mood for something different, so I ordered a gyro. I've never had one before, so I have nothing to compare it to or to judge how authentic it was. But it was yummy! The seasoned ground beef (and/or lamb?), tasted sort of like breakfast sausage. A good thing, in my book. The tomato and tsaziki sauce was the perfect complement, adding a contrast without overwhelming. The pita bread was soft and puffy.  My daughter was scared off by the tsaziki (yogurt and cucumber sauce), but after she had a taste, she didn't want to give it back to me. It's served with a generous side salad of your choice -- my choice: fattoush, of course!


When she ordered, she stuck to what she knew: chicken schawarma. (Or schwarma.) This dish is pretty common in Wichita. The base of it is hummus -- which I can be fairly picky about, since I have a pretty rockin' homemade version. Then that is topped with chicken schawarma and, usually, some grilled onions, pine nuts, olive oil and/or paprika. Le Monde tops theirs with pickles (housemade, I think), and fresh tomatoes. 


The chicken is tasty, but not remarkable. I give their hummus a thumbs up. And yes, I know I've already said that the pita bread was great, but it bears another mention! I wish they'd serve pita for the free appetizer, with some zahtaar seasoning and good olive oil. But then again, I'd probably just fill up on that! So maybe it's a good thing (for my waistline) they don't.

Le Monde Cafe & Deli (west) on Urbanspoon

Mar 20, 2012

Chicken club salad with creamy balsamic vinaigrette


Working from home has its perks and its challenges.

One of the perks is making yourself lunch every day.

One of the challenges is making yourself lunch every day.

For me, answering "What's for lunch?" usually starts with a peek in the fridge to see what protein options I have on hand. With the weather warming up, I feel like a salad pretty much every day, but it's got to have some protein.

On this particular day, I had a bit of roasted chicken, but just a small portion; not enough to make even one serving of orange-cranberry chicken salad.

So what else was in there? Some fully-cooked bacon. I'm okay with using bacon as a flavor accent, but it's not really healthy enough to be the main protein in a meal, IMHO. Hard boiled egg would round things out nicely.

So I grabbed a few eggs and boiled them. It just takes a few minutes, and ever since I got this handy little egg timer, my hard boiled eggs come out perfect every time. The product description says it best:
" Simply add the egg timer in with your eggs and boil... There's an easy-to-read scale within the timer. During the course of boiling, the timer changes colors, from red to purple, starting from the outside edge and moving to the center. When the color change reaches your desired spot on the scale, the eggs are cooked accordingly."
So although I just wanted one egg for my salad, I make a couple extra for deviled eggs, tomorrow's lunch, or who knows what. While the eggs were boiling, I fried up some of the bacon. Since it's fully cooked, that's not really necessary, but I like it crispy. (If I had a microwave, I could nuke it, but I don't.)

I chopped up some romaine, and sliced a little red onion very thin. Then, to whip up the dressing.

This is based on a super-simple dressing recipe I learned from a friend...

 Dressing option 1:

1-2-3 Dressing


1 part sugar
2 parts balsamic vinegar
3 parts olive oil

You just combine those in a jar and shake them up. Easy-peasy, right?

But there are two things I don't like about that. First of all, it's got sugar. And although you can sub another sweetener, I've found that sweetener-based dressings don't cling to the greens like the sugar-based version does.

Also, it tends to separate easily. So here's my solution:

Dressing option 2:

Creamy Balsamic Vinaigrette


2 packets Splenda (or sweetener of your choice equiv. to 4 t. sugar)
2 T. balsamic vinegar
2 T. mayo
2 T. olive oil

Put the sweetener and the vinegar in a small jar. Swirl it around until the sweetener is mostly dissolved.

Then add in the mayo and shake it up well, until no more white flecks can be seen on the inside of the jar. Then add the olive oil and shake again.

This makes enough for the generous dressing of one good-sized salad, or two smaller ones.

The addition of the mayo helps both with making the dressing cling to the salad, and keeping it from separating.

So, by this time, your eggs should be done. Rinse them with cold water for a minute or so, then shake the pan so the eggs smack against each other, to crack the shells. Then remove the shells, and slice up as many as you want for your salad.

Assembly time: romaine, chicken, egg slices, bacon, sliced onion. I wasn't in a cheese mood on this particular day, but you could certainly add feta, bleu, Swiss, or shredded cheddar to this. Then drizzle dressing over the top and toss lightly.


There you have it: a fresh, healthy, delicious salad, in less time than it would take you to drive to a bistro and read the menu!

I call that a perk.

You might also like:
30-second Caesar salad
Ginger-peanut salad dressing
Make-ahead Tex-Mex salad

Mar 17, 2012

Ancho-crusted salmon with avocado crema

This dish is delish -- I mean, truly restaurant-worthy -- but it's also super easy and totally healthy.

I have to give the hubs partial credit for this one.

I had made this spice-rubbed salmon for dinner one night, but hadn't really figured out a vegetable to go with it, and Eric was doing Phase 1 of the South Beach Diet (which is NO carbs), so I served the salmon with some romaine spears alongside and some ready-made guacamole to dip them in.

But instead of using the guacamole as dip, he put it on top of his salmon -- and loved the combination!

Since then, I've evolved the recipe a bit. I started out with a recipe called "Broiled BBQ-spiced Rubbed Salmon," from The Sonoma Diet Cookbook, but I've tweaked the spice combo each time I've made it, and I was really happy with the way it came out this last time I made it.

For the guacamole, I use Wholly Guacamole brand, and it comes in these boxes that contain individual-use packets. Which is just brilliant! If you just need a bit for a recipe, or you just want a quick easy snack, these are the perfect size, without the risk of the rest of batch turning brown before you can use it. I use the "Classic," but they also make a "Spicy" version.

Recipe: Ancho-crusted salmon with avocado crema


2 8-oz. salmon fillets, about 1" thick
1/2 T. ancho chili powder
1/2 T. paprika or smoked paprika
1/2 t. kosher salt (or 1/4 t. table salt)
1/2 t. granulated garlic
1/2 t. freshly ground black pepper
1/2 t. dried oregano
1/4 t. ground cumin
2 T. olive oil
1 2-oz. packet of guacamole (that's one two-ounce packet, not a 12-ounce packet)
2 oz. Greek yogurt (or sour cream)
optional, for garnish: diced red onion

If the salmon still has its skin, remove it. (Here's a short video that shows how. Here's a more detailed one. The directions for the filet start at about 3:00 in this video.)

Measure the thickness of the salmon at its thickest point. You want to be accurate to within 1/4". To do this, I push a toothpick into the thickest point of the salmon, then pinch the toothpick so my thumb and finger just touch the top of the fish. Then, keeping my fingers in the same place on the toothpick, I remove it from the fish and move it to a measuring stick. Make a mental note of the measurement. (Or a written note, if you have a short memory.)

Drizzle the olive oil in the pan, then spread it around. This recipe is for two servings, and for that I use a 6 x 8" baking pan, but for more servings, you'll need a larger pan. This photo is post-drizzled, but pre-spread:


Mix together all of the spices in a small dish. Before you begin to season the salmon, fold any super-thin edges under (or over) so that the thin part is doubled, and the fillet is a fairly uniform thickness across, like this.


Just press it down a little with your fingers; the fish is a bit sticky, so it will sort of adhere to itself.

Next, sprinkle half of the seasoning mix over the top side of both fillets. Pat the spices gently onto the fish.


Then turn them over and season the other side, using the rest of the spice mix.


Move your top oven rack to 4 to 6" below the broiler, and preheat broiler. Let the spiced salmon sit at room temp while the broiler heats up. Then place them in the oiled pan, folded side down, and put the pan in the oven.

Remember your fish thickness in inches? Now's when it matters! Cook your salmon for 10 minutes for every inch of thickness. So if your salmon is 3/4" thick, cook it for 7.5 minutes. 1" thick: 10 minutes. 1.25" thick, 12.5 minutes. And, turn it over once, half way through baking.

While the salmon is cooking, mix together the guacamole and the yogurt. I don't bother to measure the yogurt; I put the guac in first, then just "eyeball" the yogurt so that it looks like about the same amount.


Stir till well combined, and set aside. 

Have you turned the salmon over halfway through the baking time? Don't forget!

If you're using diced onion for garnish, now would be a good time to dice it.

A minute or two before the recommended time, check your fish. Just poke a fork gently into the side at a thick place, and pull it up a bit to see if it flakes easily. You can also pull up just enough to see the interior of the fish, and see if it's done to your liking. Some people like their salmon a bit rare, so that it's orangier on the inside. Not me: I like it just done all the way through, but just so -- not overdone and dry. (If you or someone in your house doesn't like salmon, it's possible they've only had it when it was overcooked, dry and mealy. Yuck! Who wouldn't hate that?!)

So when the salmon is done to your liking, pull it from the oven, put it on serving plates, and top with the guacamole mixture. Sprinkle diced onion on top, add your side dish, and serve.


This time, I did plan for my side dish: French-cut green beans (from frozen), steamed, and topped with sauteed onions and crispy bacon. The smokey note in the spice crust of the salmon played nicely with the slightly-smokey bacon. There's a dish dressed to impress!

Pin It

Follow Me on Pinterest

Mar 15, 2012

Make-ahead Tex-Mex salad

On days when I know I'm going to be busy the last few hours before dinner -- or on days when I'm not sure exactly when the hubs will get home, but I want to have dinner ready to go at a moment's notice -- I have several recipes that I can get all prepped earlier in the day, then throw together in a matter of minutes.

This is one of them: call it taco salad, or Tex-Mex salad, or easy ensalada... it's yummy in any language!

The first step is to chop the romaine. I use about 3/4 to one whole heart-of-romaine head for each person. And since I'm just prepping for two people, I go ahead and put the chopped romaine right into the bowls we'll be eating out of. (I'm just showing one bowl here, but I make two. Cross your eyes if you want to see two.)


Next I whip up the salad dressing. This is easy-peasy!

I put a big plop of sour cream or Greek yogurt in a small mixing bowl, then add an approximately equal amount of salsa. I don't measure it, I just eyeball it, but I'm guessing I probably use about 1/2 to 3/4 cup of each. Then I add in a teaspoon or two of taco seasoning. (Try my recipe for taco seasoning.) Stir it all together; you're done!


Then all that's left is to rinse and drain a can of black beans, slice some red onion nice and thin, and set out a small bowl of pepitas (de-hulled pumpkin seeds that have been roasted and salted). If you're not watching carbs, you could use some tortilla chips, but I think the pepitas give a nice little crunch and saltiness while being a little healthier option.


I also take a couple of cooked chicken breasts and slice them up. Some days (if I've planned ahead), I'll use chicken that I've roasted or grilled. Some days (if I don't feel like so much cooking), I'll pick up a couple roasted chicken breasts at the deli counter at the grocery store.

Then I cover the perishables with cling wrap and stick them in the fridge.

And when it's time for dinner, pull everything out, pour some shredded cheddar-jack cheese in a bowl -- or if you're lazy like me, just set the package out -- and each person can assemble their salad as they like.


(The chicken was not present for picture day.)

Since this dressing is so thick, I like to put it on the greens first then turn it over a few times to coat all the leaves, just like you would a Caesar dressing.

Sorry; no pic of the finished salad. We were too hungry! Mmm-mm!

You might also like:
Ginger-peanut dressing
Chicken club salad with creamy balsamic vinaigrette

Popular Posts