Showing posts with label homemade. Show all posts

Mar 22, 2015

Foolproof, easy, 4-ingredient homemade mayonnaise

I've been meaning to try to make my own mayonnaise for ages, because it seems impossible to find a mayo that's both sugar-free and not made with canola. Most, if not all, canola is genetically modified. And sugar in mayonnaise?! Yeah, you'd be surprised. Read labels next time you go to the store.

But I thought homemade mayo surely had to be tricky. Perfect temperatures and/or timing, danger of the emulsion breaking, that sort of thing.

Turns out... nope! I tried this recipe and method from The Healthy Foodie, and it's so easy it's ridiculous! Worked the first time, and the second. (That's all I've made so far.) All that's necessary is a stick blender, and a jar that's the right size. It might also be just as doable in a normal blender, but I haven't tested that.

And, yes, for those who care: this is Paleo, and Whole30 compliant.

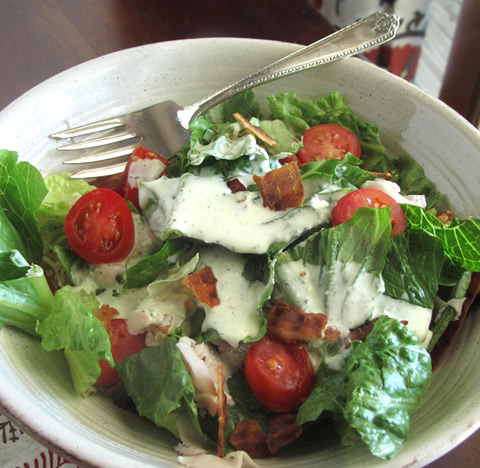
Perfect for my gluten-free, grain-free "BLT's without bread"! A super-easy, low-carb Paleo snack or meal. Quick, too, if you have already-cooked bacon on hand -- and you should!

I go crazy for these when good tomatoes are in season! But they're still pretty tasty when the only decent tomatoes available around here (<sarcasm> yay, winter in Kansas! </sarcasm>) are grape tomatoes.


Easy homemade mayo recipe

1 large egg, taken straight out of the fridge (no need to bring to room temp)
1 cup very-light-tasting olive oil (NOT virgin), or other flavorless oil of your choice
2 - 3 teaspoons lemon juice, rice vinegar, or other pale vinegar of your choice
1/8 - 1/4 teaspoon salt (start small; mix; taste; adjust if necessary)

Here's the original mayo recipe, with detailed instructions. The size of the jar matters, so I recommend looking that up.

Note: when freshly made, it tastes kinda oily. If you're going to immediately blend it into a salad dressing or slaw mix, that won't be a problem. But if it's going to be a star player, a chill in the fridge for a few hours or overnight will be a good thing.

P.S. My old Braun stick blender (also called an immersion blender or hand blender) went kaput this week, so I just ordered a new one from Amazon - Cuisinart this time. I consider it an absolute essential in the kitchen! The price goes up and down on Amazon, so if you want one and it's currently over $45 -- and you're not in a hurry -- put it in your cart and leave it there. They'll send you an email if the price goes down!

Jan 2, 2014

How to correct too-tart tomato sauce without adding sugar or sweetener


"Unless you are using sweet, height-of-summer tomatoes, chances are your tomato sauce will taste more tart than you might like. Many recipes call for adding a pince of sugar... but sugar doesn't eliminate the tartness; it just makes the sauce sweeter. Nevertheless, I did that for years until my scientist husband reminded me that the way to neutralize an acid is with a base. He suggested adding a pinch of baking soda to overly tart tomato sauce.

"It works like a charm. You don't need much baking soda to have an impact, so start with a pinch. The sauce will foam briefly as you stir it in. Let the sauce simmer for a minute or so, then taste again. Add a little more baking soda if necessary. Be careful not to add too much or your sauce will taste soapy."

From the cookbook Four Seasons Pasta, by Janet Fletcher, p. 26.

Image source: Wikimedia

Aug 1, 2013

Emergency, quick, easy barbeque sauce


Everybody's got a bottle of BBQ sauce in their fridge, right?

Except, of course, if you've already been to the store, and the meat is in the oven, and you don't want to go back out again. True story.

But a little desperation is often the beginning of a great new recipe.

A little googling turned up a recipe which claims to be "A Very Popular BBQ Sauce." It looked quick and simple, so I used this as the starting point for my DIY BBQ sauce. I needed to scale it down, cut back on the sugar, and replace the hot sauce. I was very happy with the result! I think you will be, too.
.

Emergency BBQ sauce

1/2 c. ketchup
1/4 c. brown sugar (or equivalent sweetener of your choice)
3 T. red wine vinegar
3 T. water
1 t. smoked paprika
1/2 t. Worcestershire sauce (or more if you like it, or optional if you don't have it)
1/4 t. freshly ground black pepper
1/8 t. adobo sauce, or more if you like it spicy (optional; adds heat and smokiness)
1/8 t. salt

If you'll be applying the sauce to meat that's going back on grill or oven, you can just mix it up and add it in/on.

If serving as a condiment, it will benefit from a brief heating....

Put everything in a saucepan over medium heat. Stir till well combined and cook for one or two minutes. Taste and adjust seasoning if desired.

Remove from heat and let cool.

photo credit: The mofoJT via photopin cc

Mar 28, 2013

Seven simple salad dressings


One of the easiest and most delicious things you can do to put healthier food into your body is to learn some recipes for homemade salad dressings. Once you start, you'll probably never buy the bottled stuff again! Homemade dressings just taste so much fresher. And you can be sure there's no corn syrup or {insert evil sweetener of your choice here} in it! I usually use Splenda, but use whatever you want. Most "Lite" salad dressings you buy in the store are low fat, but that just means a higher percentage of the product is carbs, and most likely, sugary ones.

Here are seven of my favorite homemade salad dressings I've posted here in the past. For a healthy body, happy taste buds!


Buttermilk Ranch (made with Greek yogurt)


Tex-Mex Dressing (three ingredients!)


Oct 31, 2012

Homemade olive oil butter spread

olive oil butter spread
photo by Kitchen Simplicity

I recently got some not-so-great news about my cholesterol, so I'm trying to cut back on dairy fat. We use real butter -- I always trust a "whole food" more than a food full of man-made chemicals -- but still, it is dairy fat. So I was happy to see this recipe from Kitchen Simplicity, which replaces part of the butter with healthy, monounsaturated, Omega-3-rich olive oil! 

I tried this afternoon. It's quick and easy to whip up, and it is nice and spreadable straight out of the fridge, like margarine. She says it doesn't taste like olive oil once you spread it on toast. I disagree, so I wouldn't use it for cinnamon toast. But with the strong influence of Mediterranean tastes in Wichita restaurants (mostly Lebanese), it's not unusual to be served bread before a meal with a dipping sauce of olive oil and zahtar (or za'atar) seasoning, so when I tasted this spread on whole wheat toast, that's what I thought of. And I just happen to have some in the cabinet, so I sprinkled a little on. Mmm!

Olive Oil Butter Spread

  • 1 cup softened (not melted) unsalted butter
  • 2/3 cup extra virgin olive oil
  • 1/4 teaspoon salt (or half this, if using salted butter)
Whip butter until loose. Slowly beat in olive oil, scraping down sides of bowl occasionally, until fully incorporated and smooth (mixture will be runny). Beat in salt. Pour into storage container and refrigerate until set.

Here's the original post from Kitchen Simplicity.

Mar 25, 2012

Peanut butter cups - homemade!


Today's post is a guest appearance by our dear daughter, Annica. Which can only mean one thing: There will be carbs!

Hello, blogosphere! There's a new sheriff in town. By which I mean I am taking over my mom's blog for a day! If you follow the blog (the wonderful, magnificent, glorious thing that is “oh, that's tasty!”) you'll know that I've been mentioned before – in passing. I'm a poor, malnourished college student, so when I come home, my parents make sure I am well fed. And I always help them along with a culinary splurge or two of my own. ;)

At the beginning of spring break, my dad announced that he was absolutely, definitely not going to bake anything sweet while I was home, and he would appreciate it if I would do the same. He didn't want my Rushmore-sized sweet tooth undermining his diet – understandably so. (I've done it before, and I regret to say, I'm all too likely to do it again.) 

Well, fast-forward to yesterday, when he says: “Hey, we should bake something to mail up to your brother.” And if some of the mail-destined sweets happen to “accidentally” make their way into our mouths, well… (Diet be damned, apparently!)

Today I head back to dorm food and Easy Mac, so yeah, I was good with making something sweet!

We debated for a few minutes about what to make, and finally settled on homemade peanut butter cups. I'd made them before, and I knew that while my brother is a fan of Reese's, he no longer would be after eating one of these babies. (Yes, they are that good.)

I went onto allrecipes.com and pulled up this recipe. Plus side: it only calls for four ingredients, all of which are easily found in any pantry in America. (You can dress it up with additions, but let's not get ahead of ourselves here.) Down side: it takes a while to make, and if you want to stay clean … well, that ain't gonna happen, flat out.

Start by melting half of a standard 11.5 oz bag of chocolate chips: milk, white, or dark. (I'm usually a dark chocolate gal – the darker the better – but peanut butter goes well with any percentage. I can honestly say I have no preference.) We used chocolate chips, but also threw in some Ghiardelli chocolate bars.


I used our double boiler, because our microwave is now sitting in my dorm room, 158 miles away. Kinda inconvenient. But you could just put the chips in a plastic baggie and nuke them on the lowest setting until they're almost melted. You'll want to be careful to take them out just a little bit early, though. Over-heated chocolate gets thick and muddy, and you don't want that near your peanut butter!


Fill a mini muffin tin with mini muffin liners. A helpful hint: the smaller the ridges on them, the better. If your muffin liners have deep ridges, they'll be harder to peel off.

If you melted your chocolate in a plastic baggie, congratulations! You have automatically completed the next step! If you didn't, transfer your melted chocolate to a plastic baggie and snip off just the tip of one corner. This is where the mess begins, if you're not careful. Here's where the mess begins even if you are careful!

Fill each muffin cup about a quarter to a third full of chocolate. It wouldn't hurt to spray them with a bit of Pam, either. You will want easy access to these things, so anything you can do to make them easier to peel, go for it!


Next, smush the chocolate up the sides. It helps to move your spoon up and in a diagonal motion, not just straight up. Moving it in a diagonal way helps to get the chocolate into the ridges. Be careful not to leave any holes in the chocolate in the bottom of the cup.


Once you've finished this, pop them in the icebox to harden up.

Next up, the peanut butter filling, a.k.a. the easiest thing to make in the world! Just mix up a cup of peanut butter, (I used Kroger's natural creamy because it consists of peanuts and salt only,) ¼ teaspoon of salt, and half a cup of powdered sugar. Some reviewers suggested adding graham cracker crumbs, in order to get that signature Reese's texture. I personally am not a fan of the texture, but if you are, then this would be the way to go.

Once this is mixed up and your shells are hardened, (which only takes a few minutes) take a spoon or a scoop, -- I used a scoop that equals about 2 T. -- and plop the peanut butter mixture into the shells.


You might need to flatten the PB out a little, with the back of a spoon, or clean fingers.


Melt some more chocolate, then transfer to a plastic baggie as before. Snip off the corner, and cover the peanut butter with chocolate. I suggest going from the outside in. That way, the peanut butter doesn't cave, and the chocolate has a chance to meld together. 


Smooth the tops off (if you want), stick 'em in the fridge to harden, and you got yourself a treat to rival an all-American classic!


And just for kicks, how about these weirdos? Yes, the beauty you see before you is nothing less than bacon peanut butter cups.


My dad is a voracious lover of all meat, especially if that meat has been smoked, and especially if that meat is bacon! We were going to make chocolate-covered bacon, but then I ended up using all of the chocolate on the peanut butter cups. Oops! So we figured, why not get a little bit funky and throw some bacon on the peanut butter cups!

I have to say, I was pleasantly surprised by how well these turned out! You can hardly taste the bacon; it just adds a little bit of saltiness that complements the bitterness of the chocolate nicely, and brings out the saltiness of the peanut butter. If I make these again, however, I'll mix the bacon in with the peanut butter.

I hope you enjoyed my guest blog! Now it's back to school for me! (With some of these little delights stowed away in my suitcase...)

You might also like:

Popular Posts